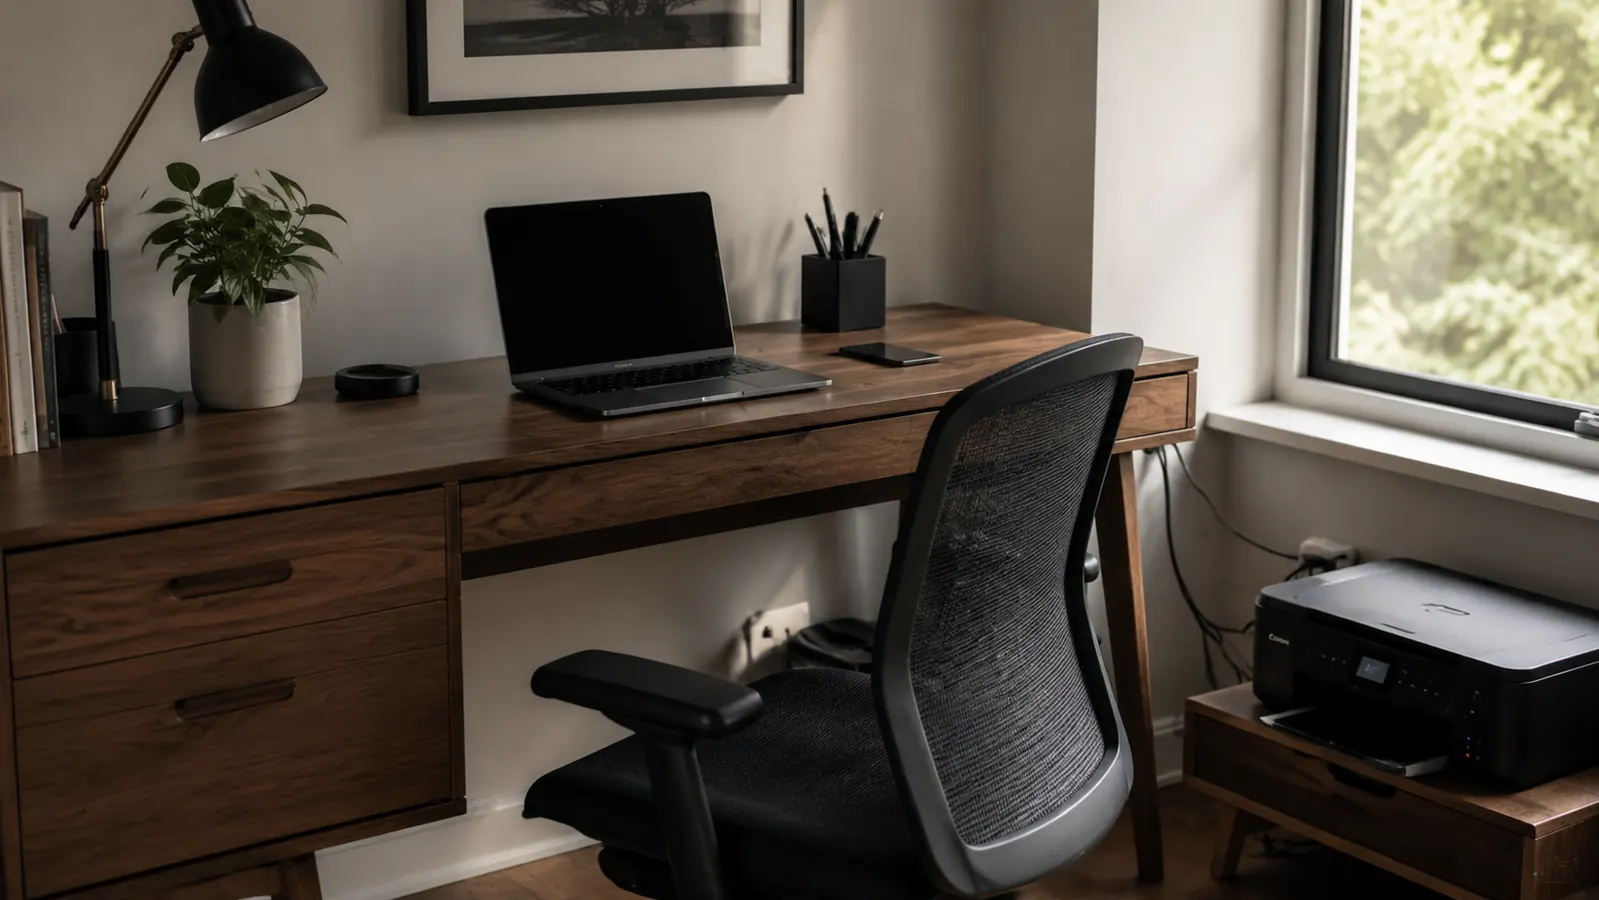
My first home office desk was 48 inches wide, and I still managed to lose about 18 inches of it to a printer I used maybe twice a week. The rest of the surface was a tangle of the monitor cable, power strip cord, USB hub wire, and whatever cable was currently falling behind the desk for the third time that month. If this sounds familiar, you are not dealing with a space problem. You are dealing with an organization problem, and organization problems have solutions.
I have spent the last four years in a 10x10 home office, and I have tested a dozen ways to reclaim desk real estate. The approach that stuck uses five steps, takes an afternoon, and costs less than a trip to a mid-range restaurant. The key tool in the process is a printer stand with built-in cable management and a storage drawer. Once the printer leaves the desk surface, everything else gets easier fast. The HUANUO Printer Stand is what I use and what I recommend to anyone starting this cleanup, and I will explain exactly why at each step where it matters.
Your printer is eating desk space it does not deserve to have
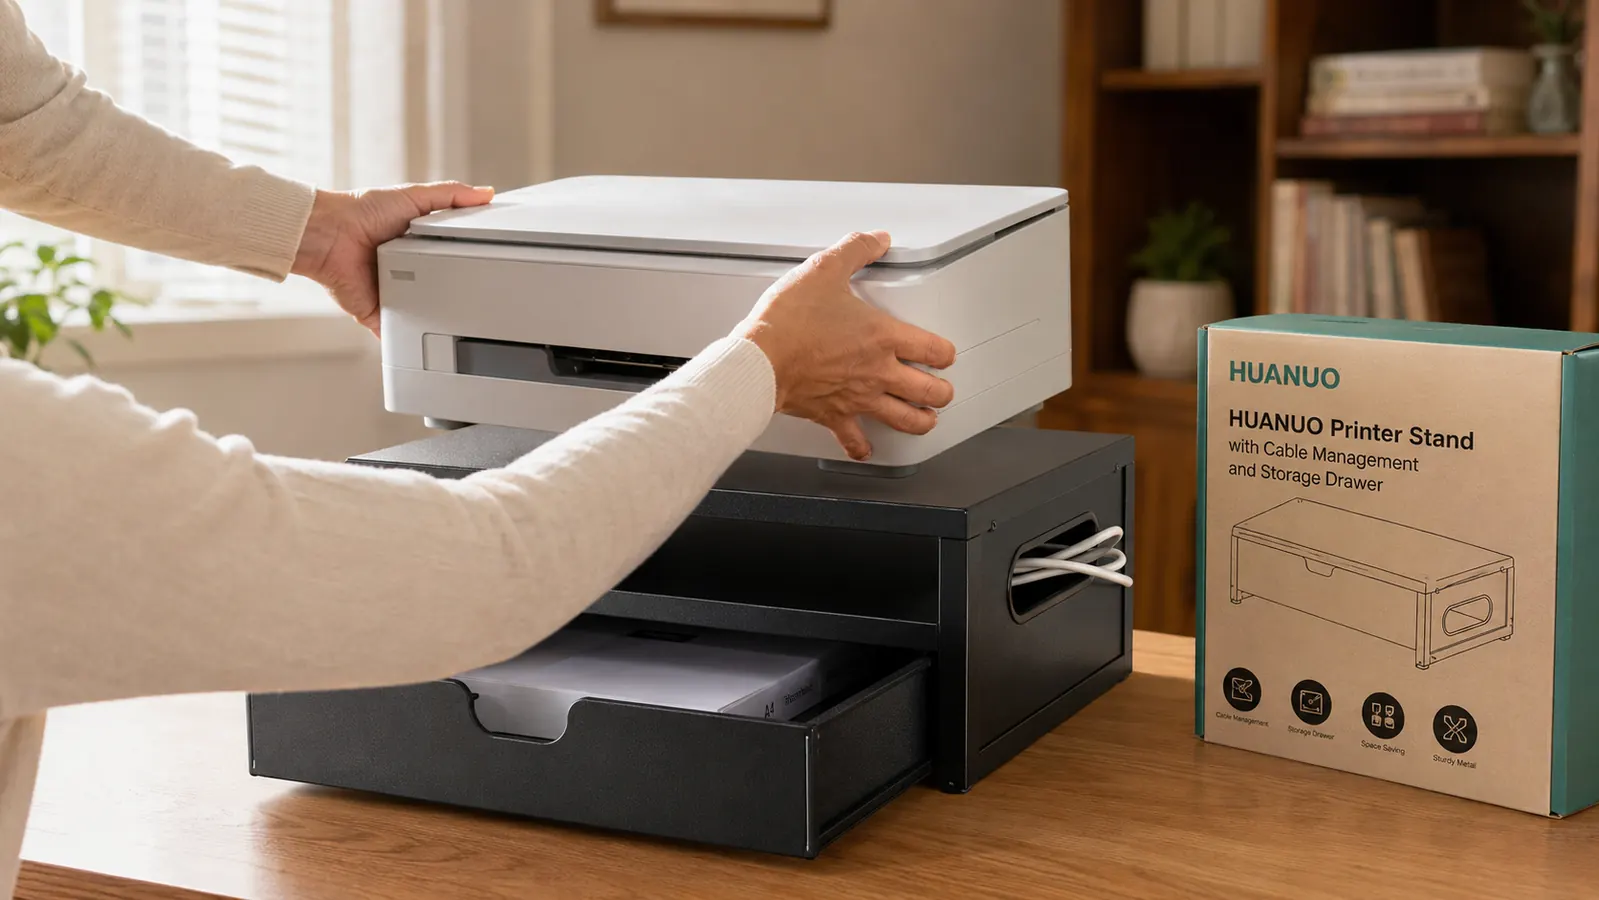
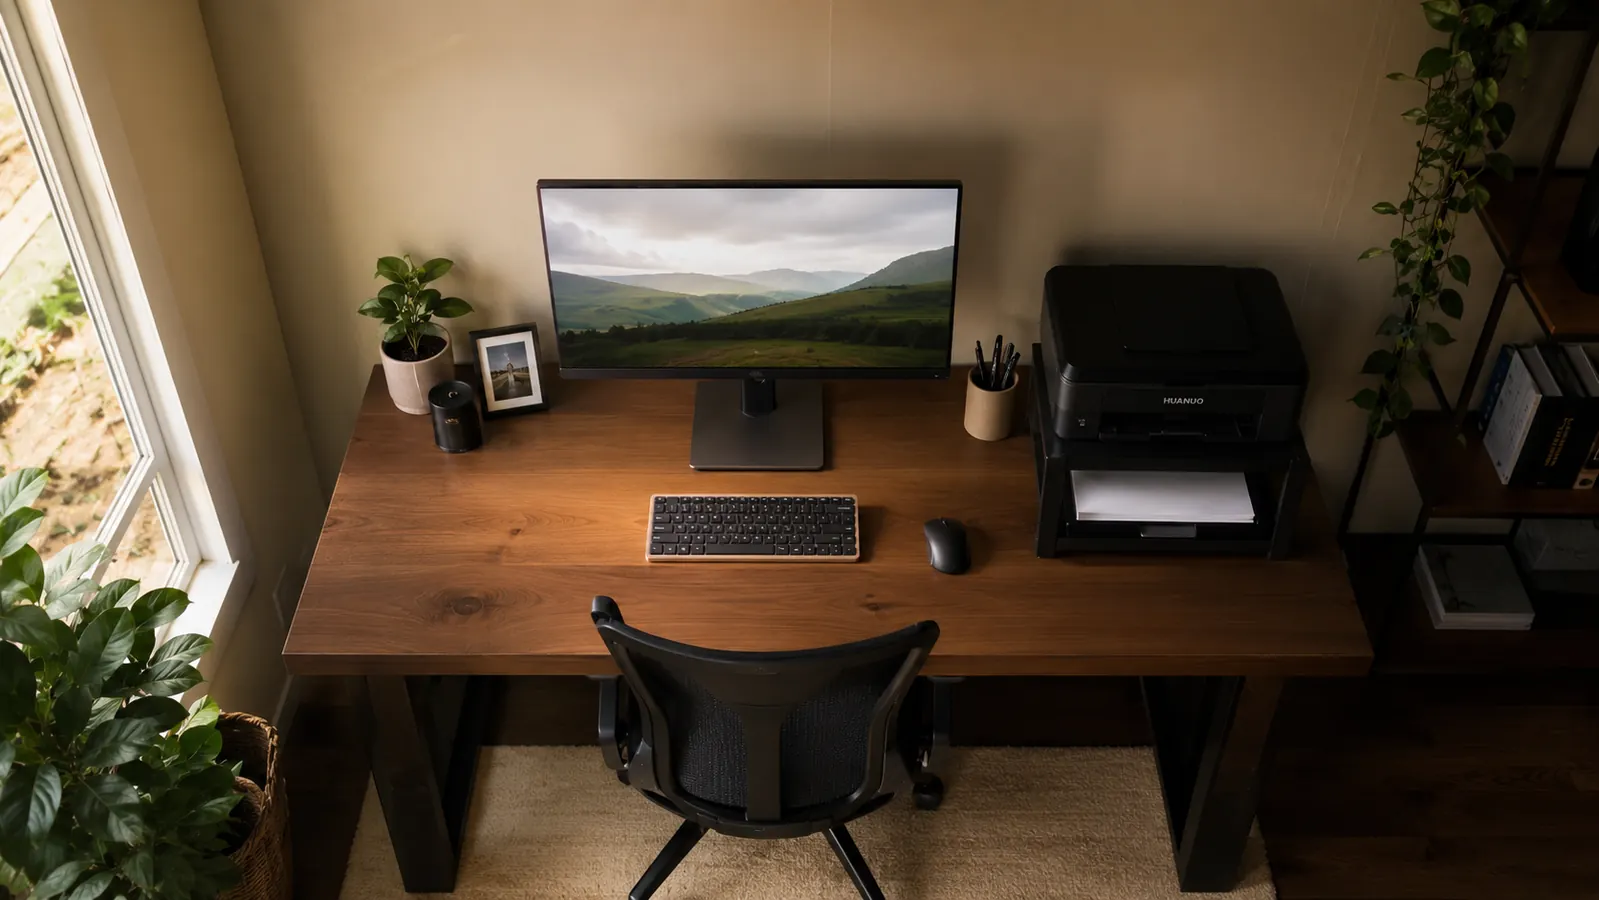
The HUANUO Printer Stand moves the printer to floor level, routes cables through its side cutouts, and stores your paper and supplies in a lockable drawer underneath. Rated 4.5 stars by over 6,000 home office workers.
Amazon Check Today's Price on Amazon →Step 1: Take Everything Off the Desk and Measure What You Actually Have
Before you move anything permanently, clear the desk completely. Yes, all of it. Cables unplugged, monitor to the side, everything. This sounds obvious but most people skip it and end up reorganizing around clutter instead of starting clean. Take a tape measure and note the exact width and depth of your desk surface. Write it down. Also measure the floor space directly to the left or right of your desk where a printer stand could live. The stand does not need to be under the desk, just nearby.
While the desk is clear, look at where your power outlet and wall plate are relative to the desk. This determines where the power strip cord runs and which route makes the most sense for cable management. Most small offices have one wall outlet within reach. Note which side it is on. That side is where your power strip and cable entry point will live, and it will anchor the entire cable plan you build in Step 3.
Also take stock of what actually belongs on the desk surface. For most remote workers the honest answer is: monitor, keyboard, mouse, and maybe a notebook. Everything else is clutter that migrated to the desk because there was nowhere better to put it. The goal of this process is to give everything a dedicated home that is not the desk surface.
Step 2: Move the Printer to a Stand Beside or Below the Desk
This is the single highest-impact move in the entire guide. A standard inkjet or compact laser printer takes up between 150 and 200 square inches of desk surface. That is roughly a third of the usable area on most compact desks. Moving it to a dedicated floor stand, positioned beside the desk or tucked under a corner, reclaims that space entirely. The printer stays at a convenient height for loading paper and retrieving pages, and you do not lose a single piece of desk surface to a machine you use a few times per week.
The HUANUO Printer Stand is specifically built for this purpose. It measures roughly 15.7 inches wide and 12.6 inches deep at the platform, which fits most home printers comfortably, and its platform sits at a fixed height that keeps the printer output tray accessible without bending down awkwardly. The steel construction handles up to 44 pounds, which covers virtually every consumer printer including bulkier all-in-one models. Assembly takes about 20 minutes with the included hardware and a Phillips head screwdriver.
The detail that makes the HUANUO genuinely useful for organization is the cable management cutout on the side panel. Your USB cable and power cord run from the printer, through the cutout, and directly to your desk without lying loose on the floor where they get kicked and caught. This one feature alone earns the stand its place in the setup. Most basic printer shelves skip it entirely.
Step 3: Route Every Cable Along a Defined Path
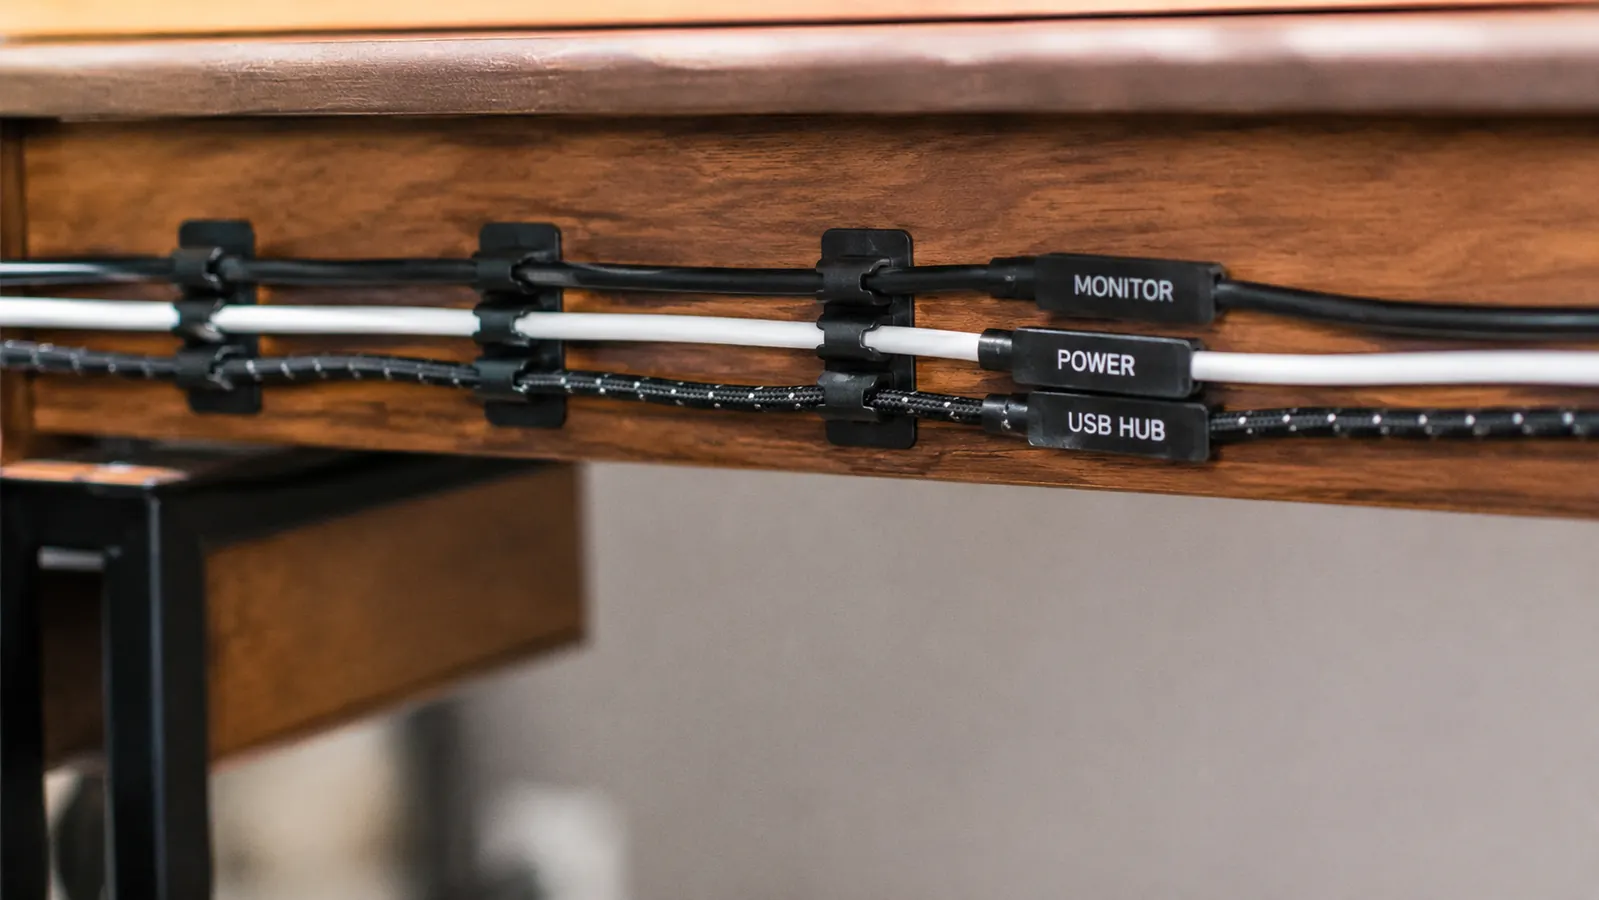
Random cables are the primary reason a cleaned desk looks cluttered again within two weeks. The fix is to define a single cable path and route every cord along it before you put anything back on the desk. The standard path runs along the back inside edge of the desk from the right side (where the power strip lives) to the left (where the monitor sits), with each cable clipped to the wood every six to eight inches using small adhesive cable clips. A pack of 20 cable clips costs around five dollars and takes ten minutes to install.
Group your cables by function before routing them. Power cables, which carry your monitor, speakers, and USB hub cords, run together closest to the wall. Data cables, your keyboard receiver, webcam USB, and Thunderbolt or HDMI cords, run in a second bundle slightly in front. Keeping the two groups separate makes it easy to trace a specific cable later when you need to swap something. Velcro reusable ties are better than zip ties here because they let you adjust without cutting anything when equipment changes.
The printer cable routes separately. It should run from the HUANUO's side cutout, up the back leg of the stand, along the floor edge using a cable raceway strip, and join the main desk cable path at the corner. This keeps it organized but also makes it physically clear that the printer cable is its own circuit, not tangled into the desk cable bundle. If you print wirelessly, even better: the power cord is the only cable, and it disappears cleanly through the HUANUO's cutout on its own.
Step 4: Use the Printer Stand Drawer for Supplies and Paper
The storage drawer on the HUANUO Printer Stand is genuinely more useful than it looks in product photos. It slides open from the front on a smooth track and provides enough interior space for two reams of standard copy paper stacked flat, plus a shallow second layer for smaller items. In practice I keep one ream of paper, a box of envelopes, my USB-C hub charging cable, and a small label roll all inside the drawer. That is four items that used to sit on the desk surface or get stacked awkwardly on a nearby shelf.
Use the drawer to enforce a rule: no printing supplies live on the desk. Every time you find yourself setting a ream of paper on your desk because you are about to print something, open the drawer instead. Over time this habit becomes automatic and the desk surface stays clear without conscious effort. The drawer closes flush with the front face of the stand, so it does not catch on anything when you roll your chair out.
Once the printer leaves the desk, the cables get easier, the clutter gets easier, and the whole setup clicks into place. That one move is worth more than any cable organizer you can buy.
Step 5: Establish a Rule for What Lives on the Desk Surface
Organization systems fail because they have no rule about what comes back. Every item you put back on the desk surface after the cleanup should pass a simple test: Is this something I touch every single day? If yes, it earns a spot on the desk. If it is used weekly, it belongs in the drawer or on a nearby shelf. If it is used rarely, it belongs in a cabinet or closet entirely. Be strict about this in the first two weeks. It is the only way to prevent the slow drift back to clutter.
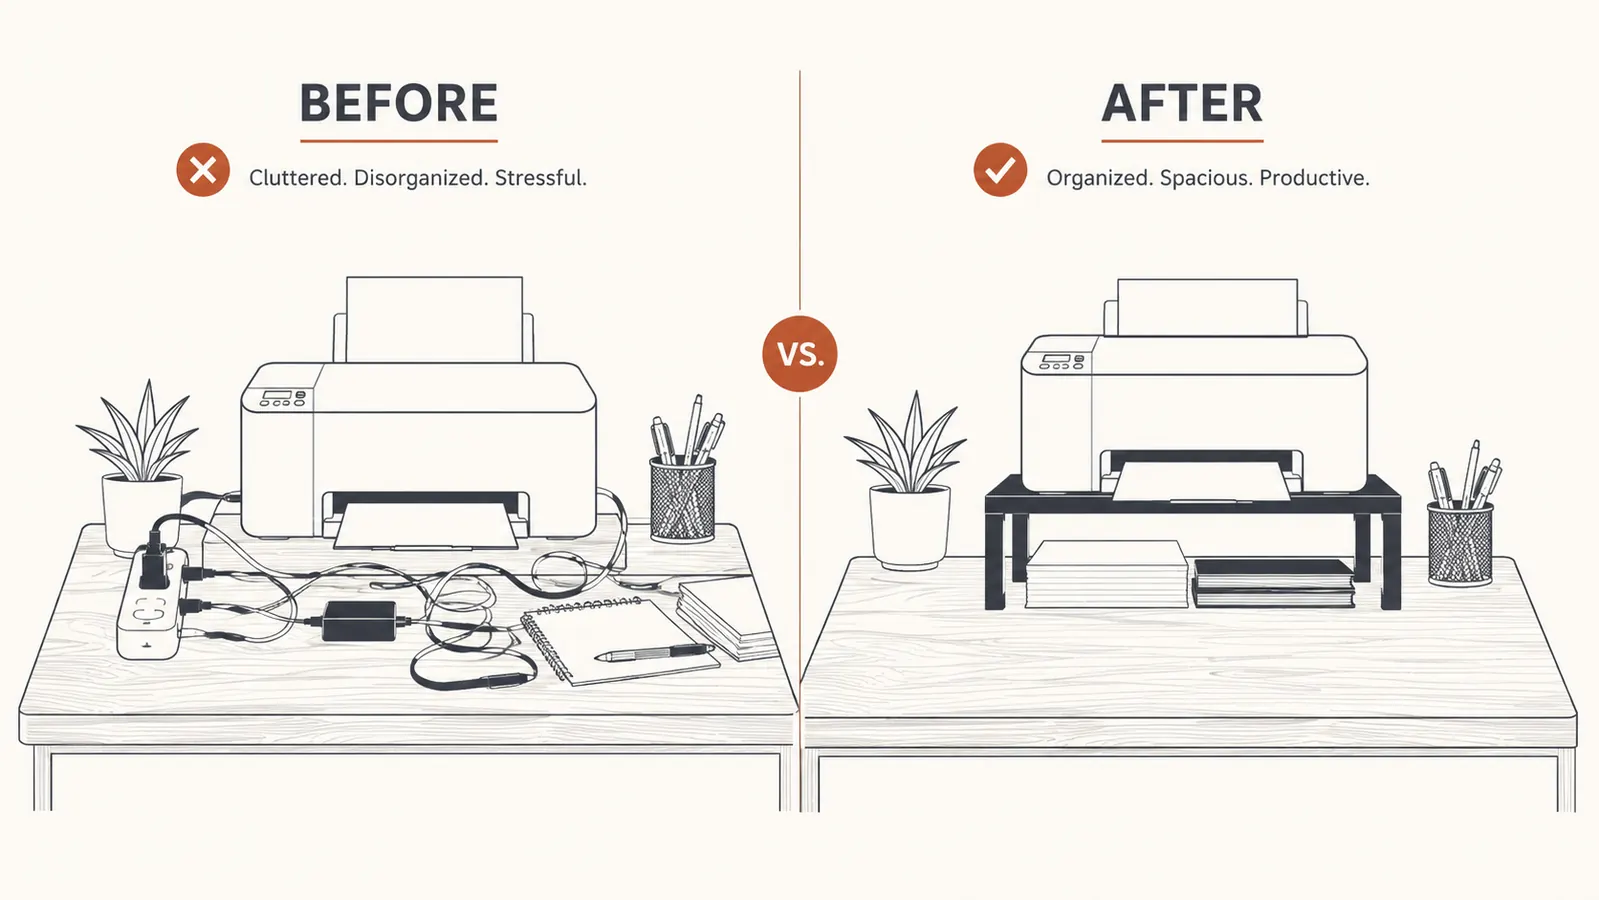
For most home office workers, the final desk surface looks like this: monitor on a riser or arm, keyboard on the surface, mouse on a pad, a notepad and pen, maybe a small plant or coaster. That is it. Phone charger lives on the edge and cables route through the cable path. The printer stand sits beside or below the desk, printer on top, supplies in the drawer, cables managed through the cutout. The power strip sits behind or under the desk, covered if possible, with all cords running to it from the cable path you built in Step 3.
Take a photo of the finished setup. This is not for social media. It is your reference point. When the desk starts drifting back toward clutter in three or four weeks, comparing the current state to the photo is the fastest way to identify what migrated back and where it should actually live. Resetting a drifted desk takes about ten minutes when you have a clear target to return to.
What Else Helps
A few additions that are not required but make the setup meaningfully better over time. A monitor arm frees up the footprint of a monitor stand, which is usually a four to six inch circle of desk real estate. A small USB hub mounted to the underside of the desk keeps ports accessible without a box sitting on the surface. Adhesive cord clips under the desk lip keep the horizontal cable run in place even if a cable gets tugged. And if your power strip is visible and you find it distracting in the background during video calls, a D-Line cable management box drops over the power strip and turns it into a clean white or black rectangle that reads as furniture, not electronics.
None of these extras are expensive. The whole list runs under fifty dollars and most of it you can source on a single Amazon order. But do not buy any of it until after you have completed the five steps above. The biggest mistake people make with desk organization is buying organizers before they understand the actual layout. Do the steps first, identify the specific gaps, then fill exactly those gaps. That approach keeps you from spending money on solutions to problems you do not have.
The HUANUO stand is the first move in this guide because it has the biggest payoff
Move your printer off the desk, route cables through the built-in cutout, and store paper and supplies in the drawer below. Rated 4.5 stars by over 6,000 buyers, available at current Amazon pricing.
Amazon Check Today's Price on Amazon →